Well-Fitting Bras: A Step-By-Step Guide to Putting on A Bra - Quick Tips and Comfort Tricks
You want a bra that fits, feels comfortable, and stays put all day. A good bra should support your shape, reduce discomfort, and look smooth under clothes, but getting the fit right can be trickier than it sounds.
This guide covers how to measure for the right size, choose styles that work for your life, and put on a bra so the cups actually sit right and straps don’t dig. There are also some quick fixes for problems like gaping cups, slipping straps, and bands that ride up.
Getting the Right Bra Fit
The right bra should support you, feel comfortable, and avoid classic annoyances like slipping bands or painful wires. Band fit, cup shape, and a few tweaks can turn an okay bra into one you’ll actually want to wear.
Essential Bra Fitting Tips for Women
Start with the band. That’s where most of the support comes from.
Try the bra on with the hooks at the loosest setting, so you can tighten as the elastic stretches out. The band should be level around your ribcage and feel snug, not suffocating.
Check the straps only after the band is set. Straps should stay up but not carve lines into your shoulders. If they slip, tighten them; if they dig, loosen or try a different size or style.
Move around a bit, raise your arms, bend forward. The cups should contain your breast tissue without spillage or gaps.
Try different styles. T-shirt, balconette, and full cup bras all shape you differently. Keep notes on what actually feels good, so you don’t have to guess next time you shop.
It’s wild, but a published study in the Journal of Chiropractic & Osteopathy found 80% of women wore the wrong bra size. Most wore bras that were too small, and just a handful wore ones that were too large.
Proper Band Placement and Underwire Comfort
Put the band low and firm on your back. It should sit horizontal, just under your shoulder blades.
If the band rides up, it’s probably too loose, or the straps are working too hard. The underwire should lay flat against your ribcage and wrap around the full base of your breast.
If the wire pokes, sits on tissue, or gaps away from your body, it’s not the right fit. Try a bigger cup or a new shape; wires need enough cup room to sit right.
You should be able to slip two fingers under the band. If you can fit more, the band’s too big. If you can’t fit any, try a larger band or softer material.
Fixing Gaping Cups and Other Fit Issues
Gaping at the top of the cup usually means the cup is too big or the shape isn’t a match for your breast. Try a smaller cup or a style with more coverage, like a full cup or balconette.
Spillage at the top or sides? That means the cup is too small. Go up a cup size and check again. If the wire sits on breast tissue, that’s another sign the cup is too small.
If the center gore (the bit between the cups) won’t lie flat, try a different size or shape. A band that rides up means the band is too big or the cups are too wide. If the band feels loose even on the tightest hook, it’s time for a new bra.
Determining Your Ideal Bra Size
Measure your snug band size and your fullest bust. Subtract the band from the bust to estimate cup size; each inch difference is a cup letter (1" = A, 2" = B, and so on).
Use the band measurement for the number. Sizes vary by brand, so if your band is too loose but cups fit, try sister sizing: go down a band and up a cup (like 36C to 34D).
Try on bras and move around, walk, lift your arms, and bend to double-check the fit before you buy. Re-measure every 6 to 12 months, or after weight changes, pregnancy, or surgery.
Measuring and Choosing Your Bra Size
Let’s talk about measuring your band and bust, using online tools, and finding sizes that actually match what’s on the tag. Follow these steps to land on a size that feels supportive and comfortable.
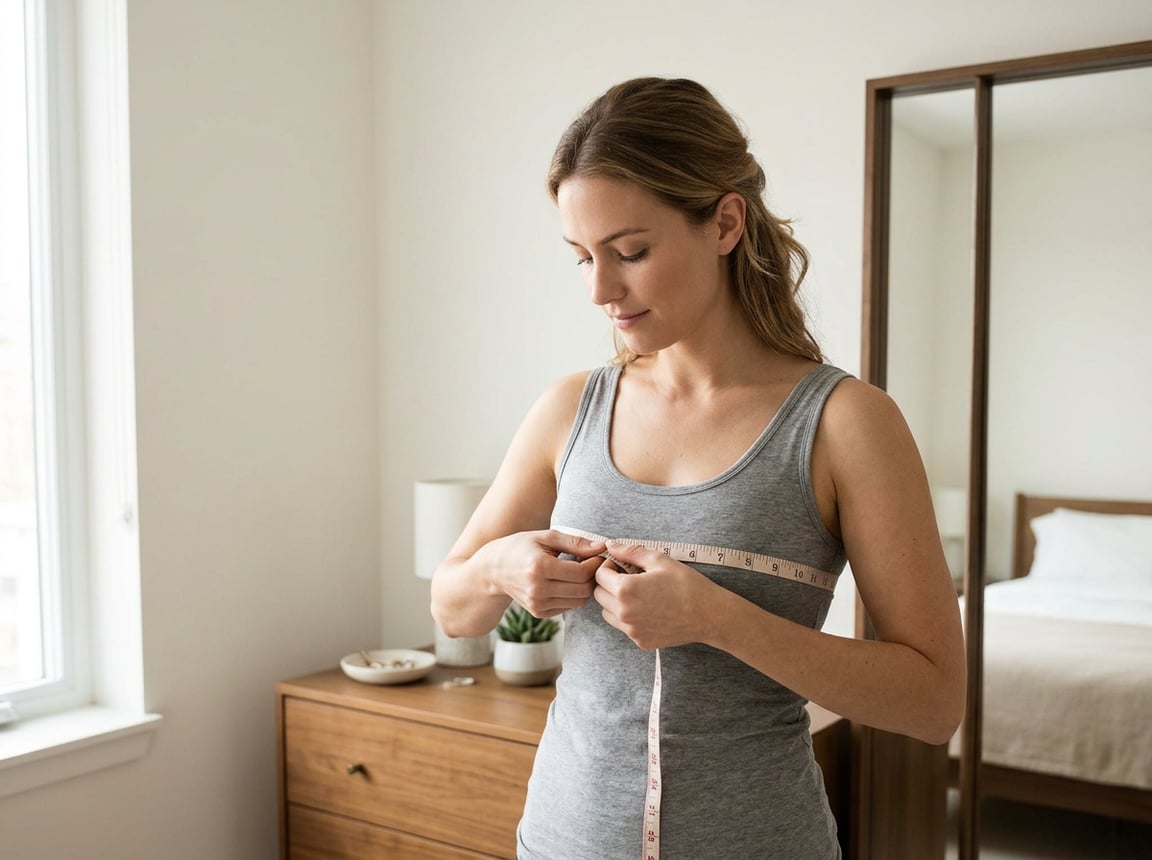
Step-By-Step Bra Size Measurement at Home
Grab a soft tape measure and wear an unpadded bra that fits okay. Stand up straight and breathe normally.
For your band: wrap the tape snugly around your ribcage, right under your bust. Round to the nearest inch or centimeter. If it feels too tight, relax it a bit.
For your bust: measure the fullest part of your breasts, keeping the tape level but not squishing anything. Write down that number.
Subtract the band from the bust. Each inch (or 2.5 cm) difference is a cup size. So, 1 inch = A, 2 inches = B, etc. Combine your band number and cup letter, like 34C.
Using a Bra Calculator and Size Guides
Bra calculators are handy; they do the math and convert between inches and centimeters. Just plug in your numbers for a quick size suggestion.
Go for calculators that let you pick units and show international sizes (US, UK, EU). Some even adjust for odd band numbers.
Now, compare your result to a bra size chart from a brand you trust. Charts help if you’re between sizes. It’s smart to try a size above and below what the calculator spits out, just to be sure.
Finding Your Correct Size in Pakistan
Most stores in Pakistan use UK sizing, but check the brand label. Local brands might list sizes as numbers (like 32, 34) plus cup letters, or even use European sizing.
If you prefer measuring in centimeters, use a local chart or calculator that supports cm. If you can’t find a brand’s size chart, ask the store staff for help.
Try on bras before buying if you can. Different brands fit differently. Sample the size you calculated, plus one up and one down (like 34B and 34C) to see what feels best.
A Beginner’s Guide to Bra Fitting
First, check the band. It should sit level around your ribcage and feel firm on the loosest hook. That’s your main support.
Check the cups. Your breasts should fill them without spilling or leaving gaps. Adjust straps so they hold but don’t dig.
Move around a bit: lift your arms, bend, walk. The bra shouldn’t slip or poke. If it does, try a different size or style. Use the fitting room to test a few options.
Selecting the Right Bra for Everyday Comfort
Pick a bra that balances support, fit, and fabric, so you’re not itching to take it off halfway through the day. Focus on band fit, cup coverage, strap comfort, and fabric breathability for everyday wear.
Different Types of Bras Explained
T-shirt bras have smooth, molded cups that disappear under fitted tops. They’re great if you want a seamless look and decent support.
Wireless bras skip the underwire and use shaped fabric or elastic for support. They’re a go-to if you want comfort and hate wires digging in.
Balconette and demi bras lift from the bottom and show more neckline. They work for lower-cut tops but might not give enough coverage for bigger busts.
Full-coverage bras wrap more breast tissue and help reduce spillage. They’re solid for busy days or if you want more support.
Sports bras come in low, medium, and high impact. Pick the level based on your activity: high impact for running, low for walking or yoga.
Push-up bras add lift with padding or angled cups. Save them for certain outfits; they’re not always the comfiest for all-day wear.
Choosing the Best Everyday Bra
Start with the band. It should be level around your ribcage and feel snug, not tight. If it rides up, go down a band size.
Check the cups. Your breasts should fill them without spilling or gaps. Wires, if there, should sit flat against your ribcage below the breast tissue.
Adjust the straps so they don’t dig or slip. Most support comes from the band, not the straps, so don’t over-tighten.
Pick breathable fabrics like cotton blends or moisture-wicking materials if you run warm. Seamless or lightly lined cups are best under thin shirts.
Try bras on with the tops you wear most. Move around, raise your arms, and lean forward to be sure the bra stays put.
How to Pick the Right Bra Type
Match the bra to your routine. For work and errands, wireless or light-support t-shirt bras are usually comfy. For long days, a full-coverage or wide-band bra gives steadier support.
Consider your cup size. Larger cups need wider bands, stronger wires, and fuller coverage. Smaller cups can often wear balconette or demi styles without trouble.
Think about your outfit. Sheer or tight tops call for seamless t-shirt bras. Low necklines need plunge or demi bras. For workouts, get a sports bra that matches your activity.
Try a few brands and sizes. Sizing is all over the place, so fit by the band first, then the cup. When you find the right type, you’ll spend less time adjusting and more time forgetting you’re even wearing a bra.
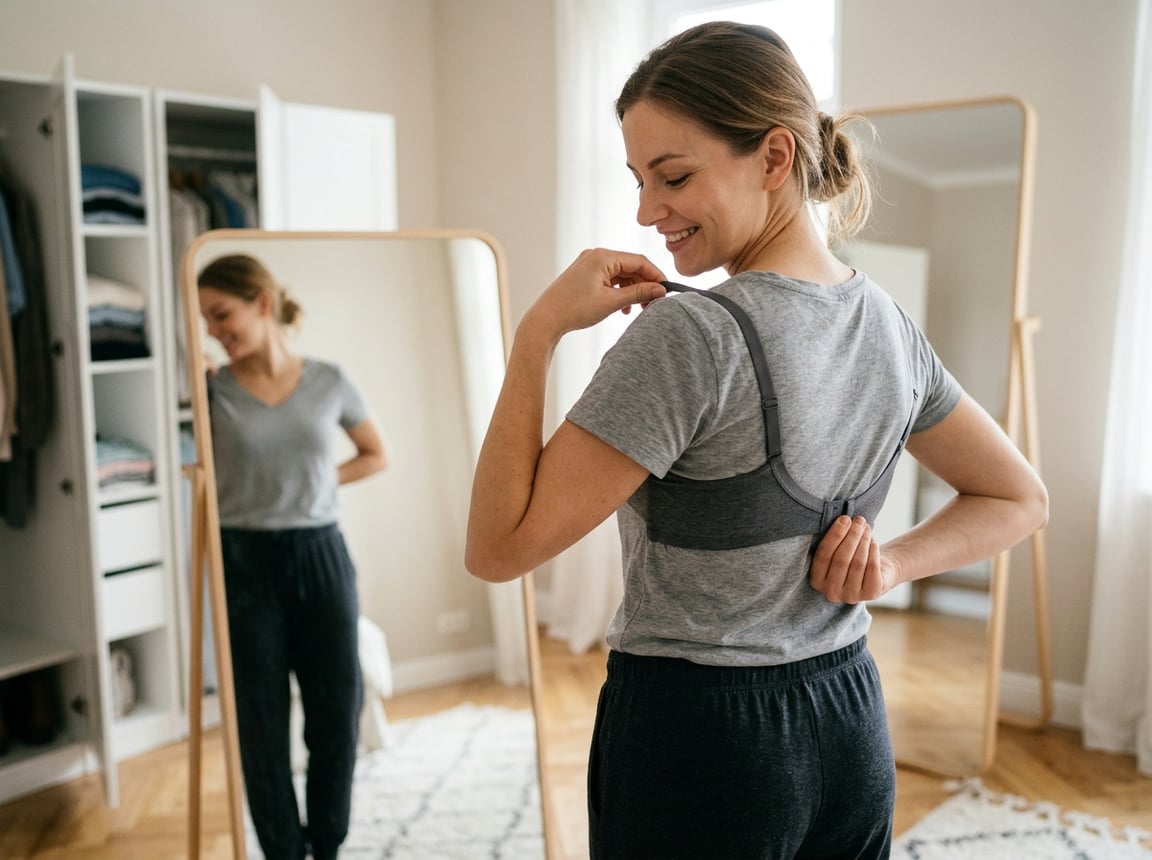
How to Put On a Bra Properly
Start with the band fastened on the loosest hooks and the straps loose. Make sure the cups lay flat against your chest and the band is level around your ribcage.
Step-By-Step Instructions for Wearing a Bra
- Unhook and hold. Slip your arms through the straps like you would a jacket.
- Fasten on the loosest setting. Wrap the band around your ribcage and hook it up. This lets the band stretch out over time but keeps support.
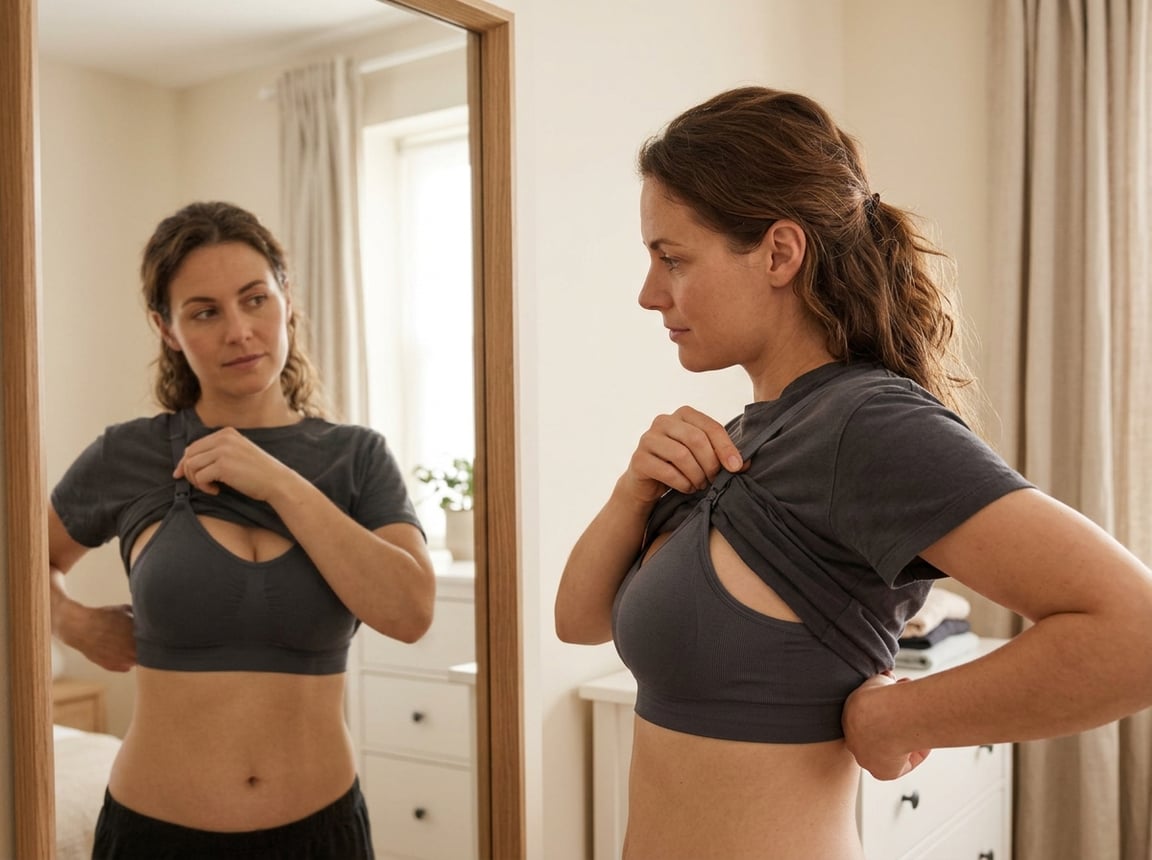
- Scoop and settle. Lean forward a bit, place each breast into its cup, and use your hand to scoop tissue from the sides and bottom into the cup. That helps avoid spillage or space.
- Check the band. Stand up and adjust so it’s level under your bust and below your shoulder blades. It should feel snug but not painful.
- Re-fasten if needed. If the fit feels off, unhook and try a different row or adjust the cups until both sides match.
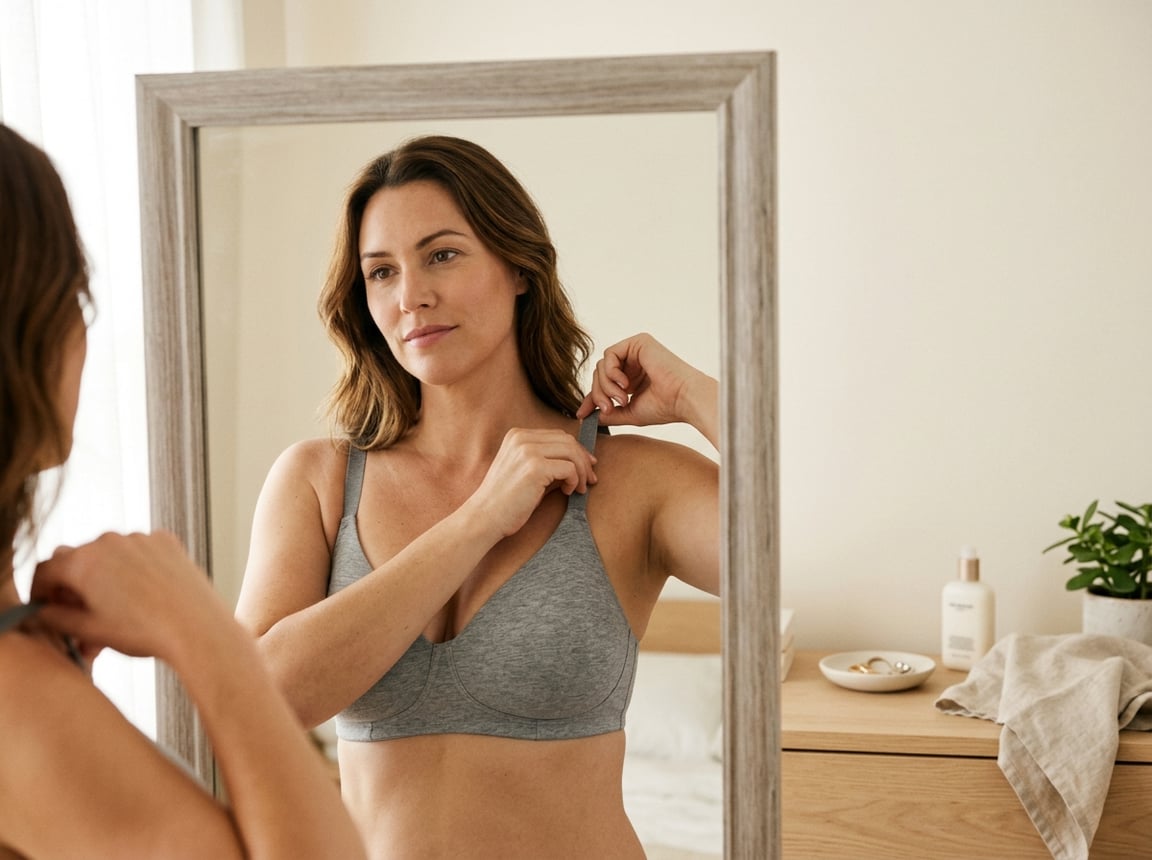
Adjusting Bra Straps for a Perfect Fit
Loosen the straps before you put the bra on. That lets you position the band first.
Tighten straps slowly after the band’s in place. Adjust until they feel supportive, but not like they’re sawing into your shoulders.
Aim for about one to two fingers of space under the strap when you raise your arms. If straps slip, shorten them; if they leave red marks, lengthen a bit.
The band should carry most of the weight. If you’re cranking the straps for support, the band’s too loose or the cup size is wrong. Both straps should sit evenly and not twist—if not, it’s worth trying another size or style.
Tips for All-Day Comfort
Pick the right size by measuring under your bust for the band and at the fullest point for the cup. Don’t forget to re-measure every few months, especially after weight changes.
Wear the right style for your outfit. T-shirt bras smooth things out under clothes, while strapless bras need a tighter band to stay put.
Sports bras should feel firm and snug to keep bounce in check. Small fixes like clear strap clips, bra extenders, or silicone inserts can sometimes help you get a better fit without buying a new bra.
Rotate your bras and hand-wash them if you can; this keeps the elastic strong for longer. If you’re feeling constant pressure, rubbing, or shifting, don’t settle; try a different size or style. Comfort really does matter for daily wear.
Troubleshooting and Solving Common Fit Problems
Let’s get into some quick fixes for annoying problems like gaping cups, slipping straps, and bands that are just too tight. You’ll also see how to spot when it’s time to let go of an old bra.
Quick Fixes for Common Bra Fit Issues
If your cups gape, try sizing down or switch to a style with less space at the top, like a balconette or molded cup. If only one cup gaps in the center, adjust how you scoop and arrange your breast tissue before fastening.
Straps slipping? Tighten them a bit and make sure the band sits level across your back. If that doesn’t help, try bras with wider or silicone-lined straps for more grip.
Underwire poking is usually a sign the wire’s sitting on breast tissue, or it’s bent. Just stop wearing that bra and try a different size or style. For a quick fix, gently move the wire back into place, but honestly, it’s probably time for a new bra.
If your band rides up, go down a band size and up a cup size (that’s called a sister size). Always start with the loosest hook when your bra is new so you can tighten it as it stretches out.
If you need another stat to drive it home, a 2008 study found that 80% of young women wear the wrong bra size, and that number doesn’t really improve as we get older. Even author Jené Luciani Sena found that 9 out of 10 women she fitted were in the wrong size.
When to Replace Your Bra
Replace your bras when the band stretches so much it slides up, even on the tightest hook. If wires poke through or underwires keep shifting, just toss it; don’t bother fixing.
Molded cups that stay misshapen after washing mean the bra isn’t supporting you anymore. Also, if you see thinning fabric, holes, or the elastic feels weak, it’s time to move on.
Notice persistent back or shoulder pain that goes away after you take off your bra? That’s a sure sign the support is gone. Check your fit every 6 to 12 months if you wear bras often.
How to Spot Signs of a Poor Fit
Watch for cups that gap or overflow, straps digging in, bands riding up, and underwires sitting on breast tissue. If you’re seeing any of these, your bra’s not doing its job.
Pay attention to your posture and comfort. New soreness, red marks that stick around, or constant adjusting during the day all point to a bad fit.
Use a mirror to check that the center gore (the bit between the cups) lies flat against your sternum. If it doesn’t, try a different size or style.
To check for gaping cups, raise your arms; if gaps appear, the cup’s too large, or the style doesn’t match your shape. For tiny gaps at the top, a lined or padded cup can help fill things out.
Frequently Asked Questions
Got questions about fit, measuring, putting a bra on, finding a fitter, band issues, or strap adjustment? Here are some practical answers you can actually use.
How do I know if my bra cups fit correctly?
Your breasts should sit fully inside the cups with no spillage over the top or sides. If you notice wrinkles or gaps in the fabric, the cup’s probably too big.
The center gore should lie flat against your sternum. If it lifts away, try a larger cup or a different style altogether.
What’s the easiest way to measure my bra size at home?
Wear a non-padded bra and stand straight. Use a soft tape measure and measure snugly around your ribcage just under your bust for the band size.
Then, measure around the fullest part of your bust while breathing normally. Subtract the band measurement from the bust measurement; each inch difference usually equals one cup size (1 inch is A, 2 is B, 3 is C, and so on).
How do I put on a bra the right way so it sits properly?
Fasten your bra on the loosest hook while standing. Lean forward, let your breasts fall into the cups, then use your hand to make sure all the tissue sits comfortably inside.
Stand up, shrug your shoulders to settle the band, and adjust the straps so they hold but don’t dig in. Double-check that any underwire sits under your breast tissue, not on it.
Where can I get a professional bra fitting nearby?
Try department stores with lingerie counters, specialty boutiques, or large retailers that do fittings. Search online for "bra fitting" plus your city name and check out recent reviews.
Call ahead to confirm appointment times and whether they carry your size. Some places offer free fittings and will bring you different styles to try.
Why does my bra band ride up, and how can I fix it?
If your band’s riding up, it’s probably too loose. The band should sit level around your body and feel snug on the loosest hook.
Try a smaller band size or tighten it if you can. Also, check that your cups fully contain your breasts; if the cups are too big, the band can ride up to compensate.
How should I adjust the straps so they’re comfy but still supportive?
Loosen the straps just enough so they aren’t digging into your shoulders. You’ll want to tighten them until you get a bit of lift, but make sure the band stays level around your body.
Actually, most of the support comes from the band, not the straps kind of surprising, right?
Adjust both straps so they’re even, then move around a bit and check again. If you notice the straps keep slipping, or they’re creating uncomfortable pressure spots, it might be time to try a different strap width or maybe a whole new style.
Conclusion
Finding the right bra is about more than just the size on the label. A well-fitted bra should feel supportive, stay in place throughout the day, and match your body shape and daily routine.
Taking a few minutes to measure yourself, adjust the band and straps correctly, and choose the right style can prevent common problems like slipping straps, gaping cups, and discomfort while improving your overall confidence and comfort.
Remember that your body can change over time, so it’s worth checking your bra size every 6 to 12 months or after major life changes like weight fluctuations or pregnancy.
If your current bras no longer fit well, replacing them with the correct size and style can make a noticeable difference in how your clothes fit and how you feel every day. Investing in a proper fit means better support, greater comfort, and bras that truly work for you.